Have you tried those '5 Minute Bread' receipt's? They take hours... Try this one instead.
You will need:
4 cups flour
1½ cups milk
6 teaspoons baking powder
1 teaspoon salt
½ tablespoon sugar
1 tablespoon melted butter
Then:
Mix thoroughly together the flour, salt, sugar, baking powder, and melted butter.
Slowly add the milk, enough to make stiff dough.
Bake in greased bread pans at 350F/180C degrees for about 55 minutes.
Yup... no need to knead!!
Sunday, 3 October 2010
Friday, 15 January 2010
Plastic Bottle Clotch


The problems with using a plastic bottle as a clotch are that the bottle will fall over in any wind if the bottle is not pushed well in, and if it is pushed well in then the soil inside the pushed in bottle will dry out.
The following is an easy way to rectify both of these problems and an easy way to use a plastic bottle as a clotch. With a hot soldering iron, remove the bottom of the plastic bottle. While it is possible to cut off the bottom with a knife the action of the hot iron will create a ridge that stiffens the bottle end. Then again using the iron, create lots of holes in the base section that will be under the soil. The ridges created around the holes by the hot iron will actually stiffen the bottle, you can see the effect in the image.
The idea here is simple in that if you place this area of the bottle under the soil then the soil inside the clotch will not dry out as the moisture in the soil will feed through the holes and as the bottle is well down in the soil then this will also anchor it and work to prevent it from being moved by the wind.
Thursday, 3 December 2009
DIY / Make Your Own Oven Chips


1. Cut out any bad parts of the potato(s)wash and then cut into chip sized slices as per the top left image, don't bother to remove the skin.
2. Place them in a saucepan and cover with cold water. Let them stand for 10 minutes or so in order to rinse out the surface starch; slosh them around a few times in the process.
3. Drain the saucepan and then cover the chips with boiling water, leave for 3-4 minutes.
4. Drain out the water and dry the chips on a towel as in the top RH image. If you click on the image to enlarge it you will see that the outer parts of the chips have changed colour as they have become par boiled.
5. Place the chips onto an oiled tray, shake them around and brush with the oil.
6. Place into a hot oven (shake them once or twice) until golden brown and crispy, as they are on the bottom RHS image.
7. Serve!
Monday, 23 November 2009
Very inexpensive yet very atmospheric DIY Table Decorations


I am indebted to my colleague Dee for this as it is her idea.
These are quite simply clear dishes with sea shells that she had picked up on a visit to the coast placed in their base. These are then covered with water (this magnifies the size and colour) and some tea light candles are then put in the water to float.
Variations on this theme include putting a few drops of food colouring into the water and then pouring a little cooking oil on top, placing a leaf on the oil and the tea light on top, and decorating the area under the bowl with a few autumn leaves.
To get the full effect please double left click on the images, that way you can see the strands of seaweed Dee had laid over the sea shells in one of the settings.
Thursday, 22 October 2009
How to ripen green tomato's

Ethylene gas is released as banana’s cells are damaged by ripening. This ethylene not only causes the banana to ripen, but also affects any other fruit nearby and I wondered if it would have the same affect on a tomato... it does. So if you have tomatoes that need ripening, put them alogside a banana to hurry the process along.
Wednesday, 14 October 2009
Plastic Bottle Watering 'Can'.


I needed a way to water some seeds without soaking the area around them and came up with this idea. less holes = less spray and this only watered the places that I wanted it to.
Friday, 4 September 2009
It’s Ice Cream Jim... but not as we know it!
OK, it’s not ice cream at all, and when I first read this receipt I thought that it would never work... but it does.
First take one banana (per person) that you have previously cut into small pieces and been frozen or cooled right down in the fridge.
Second, in a food processor or hand blender wiz them up until they are very frothy with lots of air in the mixture. The mixture will now taste like sweet banana flavoured cream.
Serve, on its own, or laced with honey, jam, chocolate chips etc.
Thursday, 25 June 2009
Three simple ideas

Some sauce always sticks to the bottom of sauce bottles so place the bottle, upside down, in a mug of boiling water and it all quickly drops to the bottom. If it has gone very hard then place the bottle normal side up first, then upside down.
If you don’t like to wear gloves when you garden yet hate getting dirt under your nails, scrape your nails over had soap to fill up the under nail area. Then when you wash the soap will have stopped most of the dirt from getting in and any that does will be easier to wash out.
Old CD’s scare off birds from growing plants as with the shining outer and the centre hole they look like eyes. You may have noticed that you can walk past a bird table without looking and not frighten the birds on them, but if you look at them they are off. Paint an eye around the hole, and /or mount two together (glue the edges) for maximum effect
Friday, 19 June 2009
Sharpen your rotary lawnmower blades


This is so easy, because all you need is a metal file, as in the images.
if you don't possess one the the local DIY shop, or car boot/garage sale should supply one. It should not so be fine that you could use it as a nail file and not so course that it looks like a mountain range.
the blade is effectivly a knife, and has a flat(ish) edge that is grass side down and an angled edge that is above.
With the lawnmower on its side, petrol tank to the top, and your file approximately matching the angle of the angled section in one hand, as in the top image, while holding the mower blade still in the other (so it does't turn) file the upper edge of the mower blade untill the sharp edge is restored. Next, as in the lower image, file the lower flat edge so to remove any metal edges that have been pushed below the blade by stones etc and restore the profile.
The blade does not need to be so sharp that you could cut yourself on it and don't worry about minor imperfections in the edge, just removing most of any damage and restoring the edges will be OK and make quite a difference to the cut. So very
much cheaper than sending the mower away for the blade to be sharpened or fitting a new part.
Wednesday, 27 May 2009
A slug barrier

I am indebted to a French gardener in a village near Piriac-sur-Mer for this idea. First take a tin can and with both ends removed, take a pair of tin snips and make the jagged edge that you can see.
Place the tin uncut edge down into the earth and you now have an edge that even the most enthusiastic slug/snail will find too daunting.
Saturday, 9 May 2009
The US & UK, separated by a common cooking ingredients language
I am sometimes flummoxed by our US friends Recipe's ingredients... what is heavy cream? Perhaps in the US people are also likewise confused... what is a courgette?
Here then is a basic list of my most popular confusions. If there are any mistakes there, please let me know.
biscuit - scone
broiler - grill
canned - tinned
cookie - biscuit
cookie sheet/baking pan - baking tray
hard-cooked eggs - hard-boiled eggs
mold - mould
noodles - pasta
pie pan - pie tin
plastic wrap - cling film
rack - shelf
shortdough pastry - shortcrust pastry
stovetop - cooker/hob
wax paper - greaseproof paper
all-purpose flour = plain flour
andouille sausage = smoked sausage
baking soda = bicarbonate of soda
bouillon granules = stock cube
cilantro = fresh coriander
confectioners' sugar = icing sugar
frozen whipped topping = long-life whipped UHT cream
corn syrup = golden syrup
cornstarch = cornflour
egg substitute = egg white
eggplant = aubergine
fava beans = broad beans
frosting = icing
garbanzo beans = chickpeas
graham cracker = digestive biscuit
granulated sugar = caster sugar
great Northern beans = cannellini beans
green onions = spring onions
ground beef (ground lamb, turkey, pork) = minced beef (minced lamb, turkey, pork)
half and half = single cream
ham steaks = gammon steaks
heavy cream = whipping cream
instant pudding mix = whipped dessert mix
Jell-O gelatin = jelly
jelly = jam
lasagna noodles = lasagne sheets
molasses = treacle
non-fat milk = skimmed milk
oatmeal = porridge
pie crust = pastry crust
pizza crust = pizza base
pork tenderloin = pork fillet
potato chips = potato crisps
reduced fat milk = semi-skimmed milk
semisweet chocolate = dark chocolate
shortening (e.g., Crisco) = butter or margarine, or vegetable fat spread (e.g., Stork)
snow peas = mangetout
tomato paste = tomato puree
whole wheat flour = wholemeal flour
zucchini = courgette
Thursday, 30 April 2009
Rushed off your feet, not a minute to think AND looking for cooking inspiration???

Not certain of what to do with the odds and ends you have? Then try THIS 100% amazing website. You simply tick the boxes for the contents of your fridge and store cupboard, click enter and the site does the rest!
On the left hand side of the list that will emerge there is a 'more' arrow. In my case, when I went down the full list, there were receipt 40 suggestions and when I narrowed the number of possible ingredients down there were still 36 suggestions, from the basic fried bacon, to a Greek dish, Keffedes.
I have yet to try out this receipt for crisps that I found on there, but I will do so ASAP:
2 Big Potatoes
1 Tablespoon Cooking oil
Method
1. Use a potato peeler to slice the potato thinly.
2. Toss the shavings of potato in the oil.
3. Sprinkle a baking sheet with salt and arrange the shavings of potato on it.
4. Cook in a preheated oven at 200*C for 20 minutes or until they crisp up.
5. When ready shake in a little salt and pepper to taste.
Thursday, 23 April 2009
A Slug Pub (trap) or how to humanly dispose of these little pests!

If you are a member of the slug appreciation society or perhaps a total Franciscan then do not read any further.... OK, so you are still with me, and this is what you need to make an effective and very, very cheap slug/snail trap.
A small plastic milk ‘bottle’
A sharp, craft type knife
Some beer
Take your milk container and wash it out. Cut a flap in the side, allowing space at the bottom for the beer. Then push the flap back down hard against the edge of the container, (rather like you were told never to do with a book) so it will crease and stay open to the ground.
Place on the ground and fill the base with beer
Leave overnight
Clean the little ****** out in the morning.
The majority of slug and snail pellets you can buy are poisonous and if a bird, frog or badger eats the deceased slug it will also be poisoned, but this way it if any of them does it may enjoy its meal even more. I always take comfort in the thought that for the offending slug, it must be a great way to go and as you can see in the image, it works very well.
PS. OK, the Stella Artois sign... sad or what...
Thursday, 16 April 2009
A DIY Sunshine Jar (childs night-light).


Some children like to have a light on when they go to bed, so here is an alternative to night lights or going in and out of the room to turn a light off.
You need one large jar with a plastic screw top, the upper section of a solar lamp and some yellow paint.
1. Drill the plastic top of the jar to fit the bulb
2. Paint the inside of the jar yellow with a thin coat of paint, a few streaks actually look good.
3. Fix the jar's screw-top to the solar gismo with some sticky pads
Done, and at the cost of under £1.75 ($2.60) including the paint!
The Sunshine Jar will glow comfortingly in the dark and will charge up in the day, especially if it is in sunlight. It is a great way to show little ones that you can actually 'bottle' sunbeans.
Friday, 3 April 2009
Make your own Muesli

Just why is Muesli so expensive when it is so easy and cheap to make your own?
You can use
3oz rolled oats
½ oz sultanas
½ oz dried apple
½ oz dried apricots
½ oz chopped hazelnuts
1 tablespoon Sunflower seeds
Other dried fruit, strawberries and dates for example are perfect as well but it is so easy to chop and change until you find a combination of ingredients that is perfect for you.
Friday, 27 March 2009
DIY Frugality

DIY is a great way to save money and it can be far simpler than you think. We live an old cottage I renovated some years ago, and our son lives in a five year old property 160 miles away. The paint on the ceiling over our shower was flaking and on son’s bathroom ceiling had also started to flake badly and where there had been a plumbing leak the water had seeped through and stained the kitchen ceiling.
If you have this sort of problem then there is an easy way around it, and it worked in both properties.
First, wearing a mask of some type if you’re working over head height, rub the flaking area with fine sand paper and remove as much of the offending areas as you can without going overboard. Then, brush on a heavy coat of PVA and leave it 24 hours, then paint over the top of it. In the case of the stained areas these were just cleaned off with a normal (gentle) surface cleaner and were not rubbed down.
If you find that there is a reaction and the surfaces you have just covered start to bubble do not panic! This happened with our son’s bathroom but as the PVA dried so the bubbles went completely down. The surface bubbled again when painted but again went completely down and many, many months later, all is still well, no flaking and no stains.
Easy and cheap, the 2.5 litres of basic PVA I bought cost less than £4 from the local DIY store. Or you could call a painter and decorator in...
Thursday, 19 March 2009
2 Frugal (Friday) Recipes from another Era
The other era is actually the early 1940s, when food rationing in the UK was in full swing and frugality tested the talents of the UK’s housewives, and hopefully a few househusbands as well. These two recipes follow the needs for those days. Those needs were for meals that were nutritious, tasty, quick and easy to make using a small number of readily available fresh ingredients and as little power as possible.
Savoury Cheese Bake
1 cup of grated cheese
1 ½ cup of breadcrumbs
1 cup of milk
1 egg
Pepper and salt for seasoning, but go easy with the salt as the cheese will already have some in it.
Warm the milk in a saucepan and add the cheese and breadcrumbs, season and allow it to soak for two minutes. Beat and add the egg, mix the ingredients well and pour into an ovenproof dish. Cook in a moderate oven until the mixture is a set golden brown.
Corned Beef Hash
1 small tin of corned beef
1 onion (sliced)
1 carrot (sliced)
1 beef stock cube dissolved in ¼ pint of water
4 potatoes
Dice and boil the potatoes for mash
Heat up some cooking oil in a frying pan and brown the sliced onion and carrot, mix the corned beef well into the stock mixture and add to the frying pan and simmer until reduced to a thick liquid. Mash the potatoes and serve pouring the hash over them.
For even greater frugality you can thinly slice the potatoes, brown them with the onion and cut down on power by not having them as mash. If it’s a meal for one, (half ingredients) and you want to be even more frugal, you can eat it straight out of the frying pan and cut down on the washing up!
These two recipes will provide meals for around 80p $1.2 per person. Nouvelle Cuisine they are not, but for those on limited budgets and ingredient availability they were perfect, and so will still be perfect.
Friday, 13 March 2009
Uses for old/used wine bottle corks... a Corking Idea?


The wine growers or bottlers names and trademarks on wine bottle corks are often a work of art, and as I hate to throw things away, I collect and reuse them wherever possible. Corks are perfect for protecting the points of sharp objects, pins, knives etc from damage or accidental personal contact, but there are other uses, for instance:
If you have any Champagne / Cava / sparkling wine corks then simply cut a slit in the top and they can be used as a place-name holder. The other place name holder uses four corks, two corks glued side to side on the lower half and glued top to bottom on the upper half so leaving a space between them for the place name.
The seed holder and spreader (I find it so much easier to just tap them out evenly rather than using my fingers) is simply a piece of old plastic pipe, cut to shape at the business end with a cork to close off the open other end. The workshop door stop, which became necessary when I changed an inward opening door for an outward opening, is simply a cork nailed to the woodwork with pin nails, small headless nails that are driven a little into the cork so they do not protrude and mark the door.
Corks make a great sanding block for small areas and tight curves, simply wrap or glue sandpaper around one. If you get fed up with having to look for the oven gloves when you are using something on the cooker, then as you can see, the corks makes a perfect insulation. If you don’t have those kitchen cabinet doors that close on their own but are fed up with the bang when yours do, then simply cut a thin slice from a cork, a kitchen knife will do this, and glue it to the inside of the door, this cuts the noise down a lot.
Double left click to see the images in greater detail.
I could go on, but I am sure you have ideas of your own.
To see what others are doing click HERE.
Thursday, 5 March 2009
It’s Frugal Friday on Thursday


Before you despair for my sanity (you may not be alone there) I know that it's Thursday, but I may be out tomorrow so here is my offering a day earlier than intended and to see what the others are doing see here.
I hate items that only have one use. Like Mrs. Average we have collections of bottles and jars that have second use potential and I will chose to purchase some goods, such as coffee, where the jar it comes in can be reused. Last week we bought four small jars of coffee rather than a large one because they fit in the fridge when filled with our home made yoghurt, (see earlier post for the recipe). But what do we do when faced with items that logically have a single use?
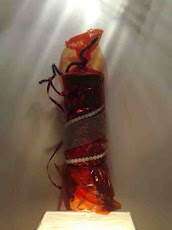
Several years ago I was given a battery clock that I put up in my workshop, sadly its case decided to disintegrate and I was left with the works which I put to one side.
When shopping in France recently, we live near the English Channel ports, I bought two 6 bottle (wooden) cases of table wine, but could not bring myself to burn the fronts in our fire because they looked so attractive.
Then the answer to the problems of what to do with the items came to me and you can see the result in bringing the two together in the image, double left-click to enlarge. Not only is there no waste I have a ‘new’ clock for free! Now that must be frugal.
How do you reuse the seemingly unreusable?
Thursday, 26 February 2009
"Buddy's" Home made Blue Cheese Dressing

You will love this (Kati), the ingredients are:
1 ½ oz of Blue Cheese, I prefer Roquefort but this is a personal choice
1 Teaspoon of Dijon Mustard
3 ½ oz of yoghurt (can be low fat, it still tastes good)
2 Teaspoons of mayonaisse (again, this can be low fat, and it still tastes good)
1 Pressed clove of garlic
1 teaspoon of Red Wine Vinegar
1 teaspoon of lemon juice
Salt and black pepper.
Put everything into a bowl except the salt and pepper and whisk to combine all these ingredients untill the consistency is OK, then whisk in the salt and pepper to taste.
This will cost a fraction of a quality proprietary Blue Cheese Dressing. Unlike the supermarket product it will only have a 'fridge stored life of a couple of days, but just what do the manufacturers do to the supermarket product anyway to give it its long shelf life and long 'once opened' life?
Click HERE to see what others are doing!
Subscribe to:
Posts (Atom)